Is Your Tampa Roof Hurricane-Ready? A Pre-Storm Checklist
The summer sun shimmering on Hillsborough Bay, the festive lights of the Tampa Riverwalk, the roar of the crowd from Raymond James Stadium—life in Tampa is vibrant and full of energy. But as every long-time resident knows, from the historic streets of Ybor City to the sprawling suburbs of New Tampa, there’s a flip side to our subtropical paradise: hurricane season.
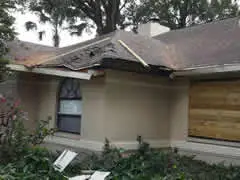
As we watch the tropics heat up between June 1st and November 30th, the question isn’t if a storm will threaten our coast, but when. While we stock up on water, batteries, and non-perishables, one of the most critical and often overlooked components of our homes is right above our heads. Your roof is your home’s first and most important line of defense against hurricane-force winds and torrential rain. A compromised roof doesn’t just lead to a leak; it can lead to catastrophic structural failure.
Is your Tampa roof truly ready to face a Category 3 storm barreling into the Gulf? This pre-storm checklist is your essential guide to inspecting, reinforcing, and ensuring your roof is prepared for the worst, whether you live in a historic bungalow in Seminole Heights (33603) or a modern home in the Westchase area (33626).
1. The Ground-Level Visual Inspection: What to Look For
You don’t need to be a professional roofer to spot initial signs of trouble. Grab a pair of binoculars and take a slow walk around your property. A thorough visual inspection from the ground can reveal potential vulnerabilities that wind and rain will exploit.
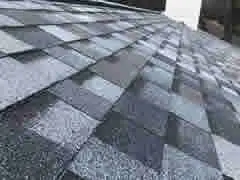
- Missing or Damaged Shingles: Look for any shingles that are cracked, curled, buckling, or completely missing. Pay close attention to the valleys and ridges of your roof, as these are high-stress areas. A single missing shingle can be an entry point for wind to get underneath, creating a peeling effect that can strip a large section of your roof in minutes.
- “Bald” Spots: On asphalt shingle roofs, you might notice areas where the protective granules have worn away. These granules shield the shingle from UV rays and physical damage. Large “bald” spots are a sign that the shingles are nearing the end of their lifespan and will be significantly weaker against wind-driven rain.
- Rust or Corrosion: If you have a metal roof, scan for any signs of rust or corrosion. Check the fasteners and screws. Are they loose or rusted? Modern metal roofs are incredibly resilient, but compromised panels or fasteners in a South Tampa (33629) home can become a weak point.
- Damaged Flashing: Flashing is the thin metal material installed around chimneys, vents, skylights, and in roof valleys to direct water away. Look for flashing that is bent, rusted, or pulling away from the structure. Damaged flashing is one of the most common sources of roof leaks during a heavy downpour.
Taking photos during your inspection can be helpful for tracking changes over time or for showing a professional contractor exactly what you’ve found.
2. Gutters and Drainage: The Unsung Heroes
When a hurricane brings inches of rain in just a few hours, your gutters and downspouts are critical for diverting that water away from your home’s foundation and preventing it from backing up under your roof’s eaves.
- Clear Out Debris: In a place as lush as Tampa, it’s easy for gutters to become clogged with leaves, pine needles from our state’s iconic trees, and other debris. Before the season starts, ensure your gutters and downspouts are completely clear. A clogged gutter will overflow, sending water cascading down your walls and potentially pooling against your foundation.
- Check for Secure Fasteners: Tug gently on your gutters and downspouts. Are they firmly attached to the house? Hurricane-force winds can rip poorly secured gutters away, turning them into dangerous projectiles and rendering your drainage system useless when you need it most. Reinforce any loose sections with new hangers or screws.
- Ensure Proper Drainage: Make sure your downspouts extend at least four to six feet away from your foundation. This prevents the immense volume of water from a tropical system from saturating the soil around your home, which can lead to foundation issues and basement flooding, a concern for low-lying areas near Bayshore Boulevard.
3. Secure Your Perimeter: Roof Penetrations and Overhanging Limbs
Anything on or near your roof that isn’t bolted down can become a problem in high winds.
- Seal All Penetrations: Your roof is penetrated by vents, pipes, and possibly antennas or satellite dishes. Check the seals around each of these items. Caulk can dry out and crack under the intense Florida sun. Applying a fresh bead of high-quality, weatherproof sealant is a simple and inexpensive way to prevent leaks. If you have a satellite dish you no longer use, consider having it professionally removed and the holes properly patched.
- Trim Overhanging Branches: Those beautiful live oaks that give Hyde Park (33606) its charm can pose a significant threat during a hurricane. Any tree branches overhanging or touching your roof should be trimmed back by a professional, licensed arborist. A heavy branch snapping in 100 mph winds can easily puncture your roof, leading to immediate and severe water intrusion.
4. Understanding Your Roof’s Structure: The View from the Attic
Some of the most critical components of your roof’s hurricane readiness are hidden in the attic. Safely head up to your attic with a good flashlight to check on the unseen defenses of your home.
- Look for Water Stains: Scan the underside of the roof decking (the plywood or OSB sheathing) for any dark stains, water marks, or signs of mold. This is a clear indication of an existing, perhaps slow, leak that will become a major problem during a hurricane. Note the location of any stains so you can identify the corresponding area on the exterior.
- Check Your Roof-to-Wall Connections (Hurricane Straps): This is arguably the most important structural element for hurricane resistance. Since Hurricane Andrew in 1992, Florida Building Codes have mandated stronger connections between the roof trusses and the walls of a home. These are typically metal connectors, often called hurricane straps or clips. Verify that these straps are present and properly installed on each truss. If you live in an older home, especially one built before the mid-1990s, you may not have these at all. Retrofitting your home with hurricane straps is a significant upgrade that can prevent your roof from being lifted off the house in extreme winds. According to recent research from the Insurance Institute for Business & Home Safety (IBHS), a properly secured roof is the key to a home surviving a major storm.
- Secondary Water Resistance: A modern, code-compliant roof in Hillsborough County should have a “peel-and-stick” secondary water barrier applied directly to the roof deck. This self-adhering membrane acts as a crucial second layer of protection. If the primary roof covering (shingles, tiles, metal) is damaged or blown off, this barrier can prevent water from pouring into your home. If your roof is older and you’re planning a replacement, insisting on this feature is non-negotiable for any Tampa homeowner.
5. Hire a Professional for an Expert Opinion
While a DIY inspection is a great first step, nothing replaces the trained eye of a licensed and insured Tampa roofing contractor. They can safely get on the roof to perform a detailed, hands-on inspection and identify subtle issues you might miss.
- Ask for a Wind Mitigation Inspection: This specialized inspection is designed specifically to assess how well your home and roof can withstand hurricane-force winds. A certified inspector will document features like the roof deck attachment, the presence of a secondary water barrier, and your roof-to-wall connections.
- Insurance Discounts: A favorable wind mitigation report can lead to significant discounts on your homeowner’s insurance premiums. The cost of the inspection is often quickly recovered through these savings, making it a sound financial investment.
- Choosing a Contractor: When hiring a contractor, always verify their license with the Florida Department of Business and Professional Regulation (DBPR). Ensure they carry both liability insurance and worker’s compensation. Be wary of anyone knocking on your door after a storm offering a cheap fix. Stick with established, reputable local companies.
Your Final Pre-Storm Action Plan
Once your inspection and any necessary repairs are complete, there are a few final steps to take as a storm approaches:
- Review Your Insurance Policy: Understand your deductible, which is often a percentage of your home’s insured value for hurricane damage. Make sure you have adequate coverage.
- Document Everything: Take photos and videos of your roof and the rest of your property before the storm hits. This “before” evidence will be invaluable if you need to file an insurance claim.
- Secure Loose Yard Items: Patio furniture, grills, trampolines, and even garden gnomes can become dangerous projectiles in high winds, causing damage to your roof and your neighbors’ property. Store them in a garage or shed.
Living in the Tampa Bay area, from the shores of Apollo Beach to the community of Carrollwood (33618), means accepting the reality of hurricane season. But it doesn’t mean living in fear. By taking proactive steps and following this checklist, you can have peace of mind knowing that your roof—and your home—is as prepared as possible to stand strong against the storm, protecting your family and your most valuable asset long after the winds have died down and the beautiful Tampa sun returns.


